Store Images in the FACULTY Table – Introduction to Databases
2.9.7.1 Store Images in the FACULTY Table
To access different databases, various data providers that work as adaptors or a data drivers are needed. These adaptors provide various functions, such as connecting to a target data source and accessing, retrieving, inserting, updating and deleting data from the data source.
In this book, we adopt a third-party product, dotConnect, as our driver to use as an adaptor to access and implement our Oracle 18c XE sample database, CSE _ DEPT.
Refer to Appendix G to download and install this free driver, dotConnect for Oracle, to your com-puter. Then we need to add some references related to this driver into our project to enable the compiler to know this driver at project building time. Perform the following operations to add these references:
1) Right-click on our new created project, Oracle Image Project, from the Solution Explorer window, and select the Add|Reference item from the popup menu to open the Reference Manager wizard.
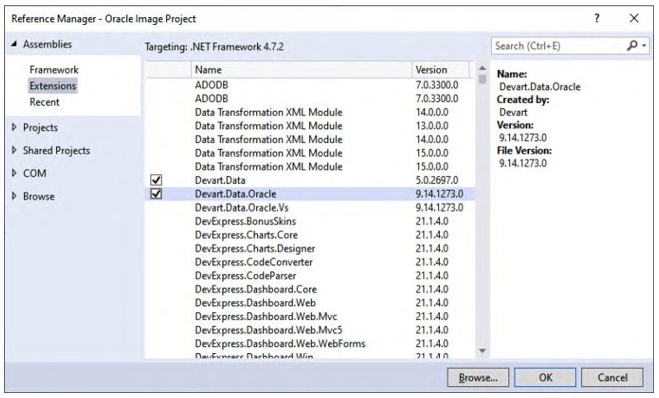
FIGURE 2.38 The opened Reference Manager wizard.
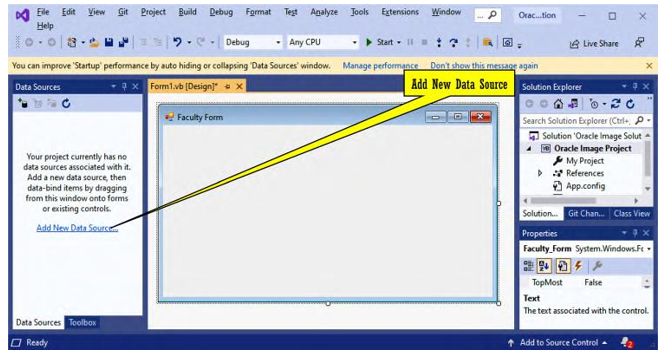
FIGURE 2.39 The Add Data Source link.
2) Click on the Extensions item on the left and select two items, Devart.Data and Devart.Data.Oracle, from the mid-pane by checking both of them, as shown in Figure 2.38. Click on the OK button to add them into our project.Now let’s use one of the Visual Studio. NET tools, Data Source, to connect to our sample Oracle 18c XE database via the added database drivers.
1)Click on the Add New Data Source link, as shown in Figure 2.39, in the Data Sources window located at the lower-left corner to open the Data Source Configuration wizard to connect to our designed Oracle 18c XE database, CSE _ DEPT.
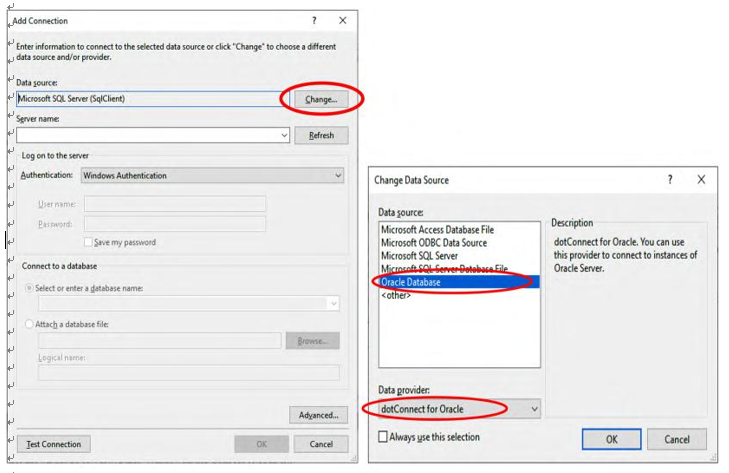
FIGURE 2.40 The opened Add Connection wizard.
2) In the opened Choose a Data Source Type and Choose a Database Model wizards, keep the default Database and DataSet selections, and click on the Next but-ton to come to our database connection wizard, the Choose Your Data Connection wizard. Click on the New Connection button to open the Add Connection wizard, which is shown in Figure 2.40a.
3) On the opened Choose a Data Source Type and Choose a Database Model wizards, keep the default Database and DataSet selection and click on the Next buttons to come to our database connection wizard, Choose Your Data Connection wizard. Click the New Connection button to open the Add Connection wizard (Figure 2.40a).
4) Click on the Change button to open the Change Data Source wizard (Figure 2.40b).
5) Select Oracle Database from the Data source list on the left, and make sure the dotConnect for Oracle component is selected in the Data provider box, as shown in Figure 2.40b. Click on the OK button to return to the Add Connection wizard.
6) In the Add Connection wizard, as shown in Figure 2.41, enter the following in the related box as the connection parameters:
a.  Server: localhost:1521/XE
b.  User Id:    CSE _ DEPT
c.  Password:   oracle _ 18c
The server contains the data source; it is formatted as Host:Listener/Database
Server. The User Id is our user account, CSE _ DEPT, and the password is oracle _ 18c.
7) Check the Allow saving password checkbox, since we want to keep it.
8) You can click on the Test Connection button to test this connection. A successful
connection message should be displayed if this connection is complete.
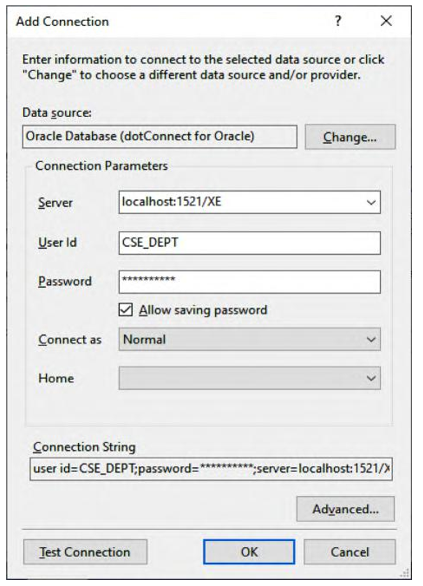
FIGURE 2.41 The parameters used to connect to our sample database.